MODERN FARMHOUSE – A DIY Homebuilding Project – Plumbing Preferences

Plumbing Preferences

Plumbing Layout-1

Yesterday John Podolak, our plumber came over to lay out his sewer lines in the foundation.  The sewer pipes have to go in prior to pouring concrete.  Sewer lines are 4” PVC pipes.

Normally water lines today are made of PEX (polyethylene) material, and are also run through the slab.  However, we are using copper lines and running them through the walls.  Some folks might not agree, but here are the reasons for these choices:

Water Lines in Walls

— This gives better access to the lines if a leak issue should develop.

— It is easier to insulate the hot water lines in the walls than in the slab.

Copper Lines instead of PEX

— Copper is more expensive than PEX tubing.  However, PEX should be sleeved when installed in a slab, which increases cost.

— PEX will be damaged by sunlight, so there concerns about how the pipe has been handled prior to installation.

— There are questions about the effect of chlorinated water on the PEX.

— PEX is made from petroleum products.  There has been some controversy about whether chemicals will leach into the water.  However, PEX is approved in all states. (California was last to approve in 2009).  Jim is personally averse to plastic water bottles, etc., so this is not a good fit for us.

This is not a decision for a whole subdivision, where cost will make a big difference.  This is just one house.  And, our plumber prefers to use copper.  He’s a single operator, and likes to do things the old-fashioned way.

Modern Farmhouse Series – All Posts

WeLoveAustin.Com

MODERN FARMHOUSE – A DIY Homebuilding Project – Firewood Fun

Firewood-Jim Firewood Firewood-Chris

Some Firewood Fun

We try to keep as many trees as possible.  It breaks my heart to lose a good tree.  But there was a small oak in the foundation area that had to come out.  Rather than see it hauled away, we cut it up for some good firewood.  They say a man who cuts his own wood is thrice warmed.  On this hot September day Chris and Jim were more than thrice warmed!

Modern Farmhouse Series – All Posts

WeLoveAustin.Com

MODERN FARMHOUSE – A DIY Homebuilding Project – Permit Playbook

Plumber

Permit Playbook

Some people say that you don’t need permits when you are not in a city, but that is not true – not at all.  Unfortunately, there is no one place where you can go to get a list of permits and inspections needed for your job.  It’s all a deep mystery.  We had to call each jurisdiction several times and hope to get a live being on the phone.  We set up a permit folder to keep us on track.

Travis County

Permit – Yes

Inspections:  None, if you are the owner/builder

Water District 18

Inspections:  (1) Plumbing Top Out; (2) Plumbing Set Out

 Driveway in Right of Way

Permit – Yes

Inspections:  (1) Pre Pour; (2) Final

Austin ETJ

Permit – Yes (electrician will obtain)

Inspections:  (1) Service – inspect ground wire before pour; (2) Final – to release to Austin Energy

Septic Permit

Permit – Yes

Inspection:  (1) Pre-permit layout; (2) Tank installed; (3) Final after field lines are in

Modern Farmhouse Series – All Posts

WeLoveAustin.Com


MODERN FARMHOUSE – A DIY Homebuilding Project – Hot Days

Lot-Chip-Mulch-3 Lot-Open

Hot Days, Hard Work

Tree Tom was our lot clearing guy.  He brought over his son, who’s been clearing since he was 12, and a couple of other guys.  Plus a giant chipper, and small backhoe.

We paid Tree Tom’s crew for their work by the day.  This could not be done as a contract bid, since we made decisions on the work as we went along.  For three days, Tree Tom’s guys cut Ligustrums, dead trees, and anything inside the house area.  Our sons, Matt and Chris, joined in and hauled logs and worked the chipper.  The mulch pile soared to over 6 feet.  The temperature soared to over 100 degrees.

We rescued many Oaks and Elms from Ligustrom prison.  The lot is looking open and beautiful.  These were hot days and good times.

Modern Farmhouse Series – All Posts

WeLoveAustin.Com

Modern Master Bath Remodel

My clients, Dawn and Ray, chose a classic 1990’s vintage home for its quiet neighborhood and easy walk to school and library.  This was a three bears kind of house – not too big, not too small – just right.  Dawn is a children’s book writer and artist.  And, you could say that she began to re-write the story of this home from the moment she moved in.  It has been fun to watch her sort it out and find the way, relying on her own artistic sense.

Her latest project has been the master bath…

Entrance to Master Bath

Here is the entrance to the Master Bath – typical 1990’s style, with panel doors, beige carpet, white tile, and big 6″ cans in the ceiling.  Mostly, the space was kept as is, but that wall on the right with the thermostat had to go!

Barn-door

Wow!  See the difference?  The door was made from a large mirror that Dawn had intended to hang.  Kai Mueller, her carpenter, added hardware to create a barn door that glides along the wall.

Vanity

Here is the original vanity, with mirrored wall, accent tiles, and chunky cabinet doors.

Vanity-Mirror

Ahh!  Now there is a sophisticated new vanity!  Home Depot installed the white Silestone counter.  Faucets are California Faucets from Ferguson Plumbing.  Candle sconce lights, by Sonneman, were ordered from All Modern.

Vanity-new

Kai Mueller made the floating vanity cabinet and mirror frame from walnut hardwood.  Hardware was selected to go with the faucet style.  Find the pulls at Lowes or Ikea.  Binswanger Glass installed the mirror glass and shower door.

Linen Closet

Here’s a glimpse of the old linen cabinet and main closet.

Towel-storage

A set of deep drawers and upper cabinet replaced the old linen/clothes hamper.  So pretty and functional!

Tile-floor

The white walls and floor contribute greatly to the simplicity and expansiveness of the space.  Walls are Simply White by Benjamin Moore.

Crown molding was removed, and ornate door and base trim was replaced by a contemporary 1″ x 6″ style.

Floors are 12” x 24” porcelain tile from Floor & Décor.  They have a light ribbed look, which adds to the organic feel.   The mirror in the closet opens to reveal the shelves behind.

Master-bath-before

A look back at the original space – very pretty, but not in the modern style that Dawn loves.

New M Bath 5170 600

The tile adds some texture and natural color to the walls – a subtle, stone-like color.  Tiles are honed marble, 2” x 4″ subway style, from Floor & Decor.  The shower floor is done in flat river rock.

By working with the existing plumbing and space layout, Dawn avoided unnecessary cost and difficulty.  She kept the focus on modern styling, and used readily available materials.  The result is clean, modern, serene – and very doable.

BTW, Dawn tells me that the glass block window is on the hit list.  This story’s not over!

Chelsea Moor Makeover: DIY Concrete Waxing

Foyer Office 5052 copy 600 Lo

We love the cool, hard surface and relaxed lifestyle of a concrete floor.  The photo above is from our own house.  John and Marie wanted to have a similar floor in their Chelsea Moor remodel.  They like the mottled, imperfect look of unstained concrete.

We have waxed concrete floors several times in the past on new construction, so have some experience in this.  However, the Chelsea Moor project involved re-finishing old abused concrete.  So, before waxing, we had to work through two levels of preparation:

Chelsea Moor Makeover: DIY Concrete Refinishing

Chelsea Moor Makeover:  DIY Concrete Patching

IMG_3692

Now it is time for the waxing.  We have an Edco Floor Maintainer, bought from Lowe’s rental department for $270.  This is a heavy machine.  It takes two people to lift it out of the truck.  A stiff brush attachment fits on the bottom.   The brush builds up heat as it turns and burnishes the wax into the concrete.

IMG_5769

The wax we use was Stone Tone Wax by Kimiko, purchased at The Stain Store in North Austin.  It may be bought in oil or water base.  The oil base wax tends to darken the concrete a little more than the water base.

IMG_5800

How-To:

First, pour some wax into a small plastic container to work from.

Then pour about 1/2 cup wax on the floor.  If you pour  too much wax at once it will not burnish into the concrete fully, and will leave a sticky residue.

Plan to cover about a 4 x 4 foot area with 1/2 cup wax.

Run the heavy buffer over the wax slowly to spread it and rub it into the concrete.

Continue buffing for about 5 minutes to built up heat and burnish the wax into the concrete.  The wax fills the pores and seals the concrete.

IMG_5770

The color of the concrete will darken slightly when the wax is put down.  Here you can see the color enhancement in the waxed area.

IMG_5805

The waxed floor will be slightly glossy and smooth to the touch, similar to a smooth stone.

The re-use of old concrete is a green choice.  Concrete lives well – it does not hold dust and is very easy to clean with just a damp mop.  And, the clean hard surface goes well with modern simplicity.

Concrete Experiences – Round One

Concrete Experiences – Round Two

Concrete Experiences – Keeping Cracks in Line

Thanks for sharing our Chelsea Moor makeover!

Roselind Hejl

www.weloveaustin.com

Chelsea Moor Makeover: DIY Concrete Refinishing

We have used concrete as a finish floor on new construction before (see links at bottom), but these past experiences had not prepared us for refinishing old concrete.  It took some true grit to deal with the mud, the dust, and the backbreaking labor of this job.     

At Chelsea Moor we had several concrete floors.  Most of the house was poured in 1978.  There was an addition, ten to twenty years later.  And, there was the concrete we had just poured in the living area to raise the floor level.

Floor-paint-600-142 IMG_3608  

Old Paint and Glue

The old 1978 floor had a lot of paint on it from the original construction.  In those days no one considered concrete as a finish floor, so they had no reservation about spraying the floor along with the baseboards. 

The kitchen and bath floors were coated with glue and backing from old sheet vinyl.  And, in the sun room, there was a tough layer of glue left from the outdoor carpet.  

We wanted to clean the floor and unify the several concrete vintages by grinding off the top layer of concrete.  What to do and how to do it has been a process of discovery.  We had to search the internet, call rental places, and bother people to figure out how to get this done.

IMG_3692

Hex Pins and Sander

We hoped to make do with our own machine – a Clarke Floor Maintainer, purchased from Home Depot for about $270.  They sell their rental machines when they are ready to replace them.  This machine can be used for waxing concrete, which we have done several times in the past. 

This machine can also take a hex-pin attachment from Pearl Abrasives, which was supposed to take off the paint and glue.  We rented the hex pin attachment from Home Depot.  The hex pin attachment  took off some of the surface paint, but would not remove the deeper paint that had penetrated the surface of the concrete.  It made a whole lot of dust.  Strike one.

The guy at Home Depot loaned us a sander attachment, and we bought a couple of sand paper disks.  The sander did about the same job as the hex pin. We tried putting water on the floor to reduce dust, but the sanding disk quickly became coated with gunk and would not work.  Strike two.

009

Stone Grinder

Several rental places recommended a stone grinder.  This is an Edco machine, which we rented for about $300 for a week.  It weighs a ton.  You rent the machine, but buy the stones.  We bought a set of each stone texture – course, medium, and fine.

When water was put on the floor to reduce the dust, the stones clogged up with gunk and would not work.  They had to be taken off and cleaned.  Fortunately, we found that if you put down a lot of water it kept the concrete slurry thin, and the stones did not gunk up.   (So back in business.)

We used a floor squeegee (from Home Depot)  to pull the slurry into a pile, and a wet vacuum to clean it up.  

The machine cleaned the floor, but was not sharp enough to hone off as much of the concrete surface as we wanted. We were not satisfied with the result.  So, strike three, sort of.  

048

Diamond Grinder

We went back to Home Depot and bought a diamond disk for a hand grinder that we happened to have.  Baldo and David took turns going over the floor with this.   

The diamond blade was a more aggressive tool than the stones.  It took off a thin layer of concrete.  We did the whole 2,200 square feet with a small hand grinder.  The blade had to be replaced at one point.  Then the hand grinder burned up and had to be replaced.  (We could not find a place to rent a large diamond grinder, but would manage to do this next time.)

022  003

Diamond Grinder + Stone Grinder

After a pass with the diamond grander, we followed behind with the stone grinder to smooth the surface and take out swirl marks.   

The mud slurry from the grinding had to be vacuumed with a wet vac.  This was a hard job in itself.  Even with water on the floor, a layer of dust coated everything – even the walls and ceiling. 

We used a heavy duty fan to keep the dust off our two workmen, but even with the wind chill, it was about 95 degrees in the house.  The neighbors wondered about the clouds coming out the windows. 

032

Final Result

The grinding and cleaning took about 9 days all total.  I’m waiting for amnesia to set in, but we liked the final result.  It is clean and speckled with some of the sand and pebbles.  The color ranges from grey to tan color.   This is a rustic surface with mottled color, a few cracks, and some patches where nails had been pulled.  But we love it for its imperfections.  It’s the easy living floor – and it was there for the taking.      

Concrete Experiences – Round One

Concrete Experiences – Round Two

Concrete Experiences – Keeping Cracks in Line

Thanks for sharing our Chelsea Moor Makeover!

Roselind Hejl

www.weloveaustin.com

Chelsea Moor Makeover: I Turned My Camera On

(Guest post from Marie Hejl –   http://cocinamarie.wordpress.com/ )  

And that’s pretty much all I did on this phase of the project.  As you’ll see from the pictures, my dad, my husband, and our trusty contractors deserve all the credit for the next phase in our home remodeling process.

When John and I bought the house, the living room had wood paneling on the walls, carpet on the floor, and thick wood beams on the ceiling.  Here is a picture of the room in its original form.

For reference, the breakfast room and kitchen are located on the right side of the picture above.  The picture below provides another view of the breakfast and kitchen area from the living room.

There were a number of issues that we wanted to correct in this space.  In addition to removing the paneling and carpet, raising the sunken floor, and re-doing the fireplace (see previous post), we wanted to connect the living, dining, and kitchen areas in a way that would be suitable for large family gatherings, dinner parties with friends, as well as occasional cooking classes (and possibly another cooking show!).

With those goals in mind, the first step was to remove the paneling and carpet, along with the beams on the ceiling, and the half-wall (and lovely spindles) between the living room and breakfast area.

Then we had to deal with the back wall, which contained an off-center window, some awkward wall space, and a door leading to a sunroom.  For us, the sunroom would have been wasted space.  We decided to make the sunroom into our dining room, and we wanted this new dining room to connect to both the living room and kitchen.  To achieve this connection, we removed the door to the sunroom and part of the adjacent wall, thus, broadening the opening between all three of the spaces.

Next up?  The window.  The original placement of this window truly did not do the house any favors.

The window looked out to an inaccessible and poorly maintained outdoor space—crammed between the walls of the dining room (on the left) and the master bedroom (on the right).  In removing the window, our goal was to allow this outdoor space to serve as a connection—rather than an obstruction—to the backyard.

And it looks better already!  The living room now opens to a partially-shaded area (soon to be a rustic limestone patio), providing a seamless connection to lush green grass and mature oak trees.

Here is the view from the inside.  We had to use some temporary supports before the actual framing (hence, the two-by-fours from ceiling to floor).

Here, the framing is complete.  Then it was time to bring in the sliding glass door.  Although we considered using double French doors, we decided that a large sliding glass door would be a better fit (more modern, less colonial) for our personal style and the intrinsic structure of the house.

As it turned out, the sliding glass door was indeed very large, and very, very heavy—weighing nearly 300 pounds!  It took four strapping young (er, middle-aged) men to move it from the truck to the back of the house.  Not an easy job.

Once they got it this far, my dad realized that we did not have enough of the glue that we needed to secure the door to the concrete.  So John ran to Lowe’s to pick up the supplies.  And my dad (wisely) took that extra time to re-read the instructions for the installation of the door.

Now, they’re back at it.

Finally, the door is in place.

After a making a few final adjustments, the installation is officially complete.

Here is a view from the inside.  It is just what we wanted!  Open, connected, and appropriately modern.

Thanks for sharing our Chelsea Moor Makeover!

Roselind Hejl

www.weloveaustin.com

Chelsea Moor Makeover: Sun Room Converts to Dining Room

At some point in the life of Chelsea Moor, an addition was made.  This may have been called the Sun Room, since it is nearly all windows.  The windows bring in beautiful eastern sunlight. 

450-addittion-3131

   
The addition was built onto the back of the house in an ill considered way.  It sits in the middle of the outdoor space where the patio was located.

450-Old-Patio-3133

We will have to make good use of the outdoor space that was left between the addition and the house.  It is now an unused area with a sickly shrub.   Those pink concrete pavers served as a sad patio.     

450-Beams-3166

The Sun Room was isolated from the main house.  It was entered through the glass door at the end of the living room.  Since the living room was “sunken” there was an unexpected step-up when the door was opened.  If you had not already stumbled off the step-down into the living room, you definitely will trip here.

450-Sunroom-3214

Here is the view from inside the Sunroom.  The exterior stone wall and the window into the kitchen make it clear that this room is not a true part of the house.  To complete the added-on look, there is a window AC, gas heater, outdoor carpet, and wall paneling. 

450-Sunroom

In our plan, the Sun Room is going to be the new Dining room.   We wanted to make this space a real part of the house – visually connected and fully used everyday. 
    

Sunroom-stone-wall-3405

To accomplish that, we needed to break down the wall.   Thanks to Craigs List, both the window and stone found new owners. 

Sunroom-opening-up-3483

With the entrance to the new dining room opened up, the living, kitchen, and dining spaces now flow together.

450-openwall-dining-3616

The new dining room is filled with natural light and will be a wonderful place to eat everyday.   

Thanks for sharing our Chelsea Moor Makeover  project!
Roselind Hejl
http://www.weloveaustin.com/

Chelsea Moor Makeover: People Who Need People

People who need people use Craigs List!  This has been a great resource during the remodel of Chelsea Moor.        

clip_image001

For example, as you can see from this photo, we had an overdose of fencing on this property. In the old days it would have been a huge job to dig up 230’ of chain link and haul it to the landfill. But, with a simple Craigs List ad, a dozen people stepped up to the plate to help us out.

Chain-link-450

A sweet family in Elgin, needing chain link for their land, came over and removed all the metal posts and fence material.

clip_image003

We had plenty of good carpet to give away.

clip_image004

A young man took it to soundproof his music studio.

clip_image005

The stove, cabinets, fans, windows, paneling, blinds, sinks, and faucets all found new homes, thanks to Craig.

clip_image006

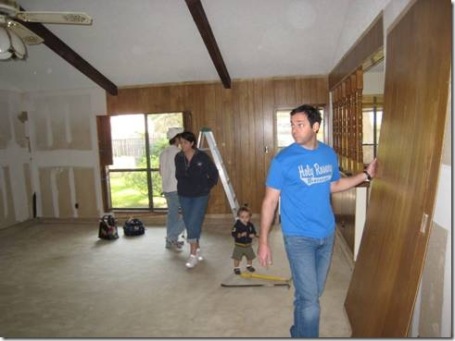
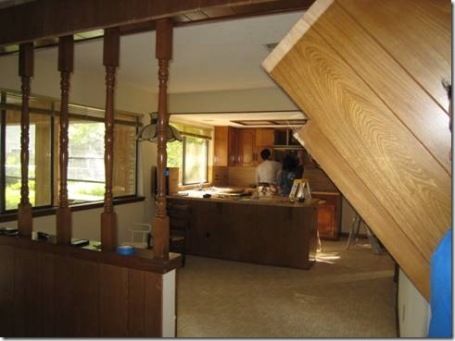
Here’s the living room paneling coming out.  Lucky break – there was sheetrock underneath.

clip_image007

Here is the kitchen going…

clip_image008

Going…

clip_image009

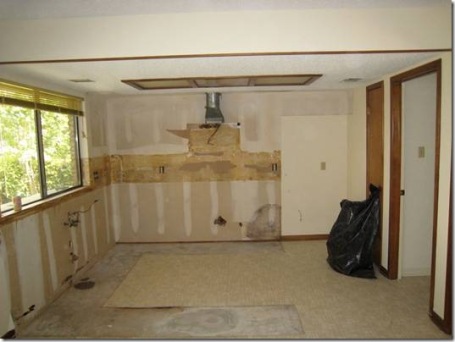
Gone…

Thanks for sharing this project with me!

Roselind
www.weloveaustin.com